
Mozzarella Cheese Recipe
One of the first cheeses people want to learn to make is Mozzarella. It is a very common and useful cheese, so this makes sense. It is also one of the few cheeses that freezes well, so you can store it up for the winter. The problem is, I have found Mozzarella can be pretty tricky, especially for a beginner cheesemaker. Finally, after years of trying to produce a consistent cheese: a stretchy, tasty, well-textured Mozzarella, I've succeeded.
One of the problems with learning to make cheese is that if you don't have someone to show you, you have to figure it out on your own. This has been the way it is for me; I'm totally self taught. Some aspects of cheesemaking are a real knack and feel kinda' thing that just takes time to figure out. This is the way it's been for Mozzarella and me. There are many different recipes, and many different ways of doing things.
There are several "keys" to making successful Mozzarella. You really need to understand why you are doing, what you are doing. To achieve the desired stretchiness that you want in Mozzarella, you must develop acidity in the curds. This acidity is what allows the curds to stretch: no acidity, no stretch. If you have no stretchiness, you cannot properly "work" the curds, and so you cannot develop the proper texture. It is during the "working" of the curds that the nature of the curds changes to become what we know, as Mozzarella.
One thing you must also keep in mind, is that too much acidity is not good either. Too much acidity and the curds become a hopeless mess.
The easiest way to help develop the acidity in your Mozzarella curds is to add citric acid to the milk before the ripening process begins. The standard amount of citric acid to use tends to be 1 1/4 tsp. per gallon of milk. Don't bother trying ascorbic acid in place of citric, because though they seem like they are the same things, I have not had success with ascorbic acid (though I have been told some commercial producers do use ascorbic acid successfully). There's no reason to risk failure if you don't have to. You can order citric acid from a cheesemaking supplier, but you can also find it cheaper at a health food store, wine-making supplier or on-line.
Another way of developing the acid in the curd is to extend the ripening time. The best way to do this is after the curds have drained, to place them in the fridge over night.
To confuse things even more, you can use an extra culture to help increase my acidity. This culture is called Streptococcus salivarius subsp. thermophilus or TA for short, but it is not commonly available through most retail cheesemaking suppliers, but you can purchase it from Get Culture Inc. I used to use this second culture because it adds a bit more flavor to the cheese, but I also had problems with timing the "working" the curds when I used it, so I found, after much trial and error, that I can make Mozzarella just fine without using this second culture.
The second "tricky" thing about making Mozzarella is the "working of the curds". This is where I got lost over and over. Working the curds involves heating them in hot water and stretching them. You can do this step in the microwave (many people do), but I found, that once the working is mastered using water, the end product is much better and less rubbery than the microwave version. It's also much more fun and gratifying. Using salted water to heat the curds is also more authentic.
Making Mozzarella is not that time consuming but is does take three stages, that can be completed in one day or could stretch over a three day period. If you start it one day, you should make sure to allow time to finish it the next day. It you forget to finish the cheese the next day, you can do it the next day after that. If you go any more days, forget it; don't even bother trying to "work" the curds. They will just become an awful mess (I know from experience).
Mozzarella
The following are detailed instructions on how I make my homemade Fias Co Farm Moz.
I do not recommend that you try this as your first cheese attempt, please start with something a little easier like Panir and work your way up to making this cheese.
Ingredients:
- 2 to 3 1/2 gallons fresh goat or cow milk (not homogenized!) - (I use a little over 3 gallons of raw, unpasteurized goat milk)
- 1/4 tsp. Thermophillic culture DVI "LH" (Lactobacillus helveticus) or 4 oz. Thermophillic culture (from a mother culture)
- 1 1/4 tsp. citric acid per gallon of milk - (I use 4 tsp.)
- 1/4 tsp. calf lipase (mild "piccante") (lipase is animal product- vegetarians may wish to omit this, but the cheese will not have as much flavor )
- 1/2 tsp. Liquid Rennet diluted in 1/2 C. cool water - (NOTE: I use 1/4 tsp. Double Strength Vegetable Rennet)
- 1/2 C. Kosher salt
|
Of course you should sterilize all your equipment before you begin.
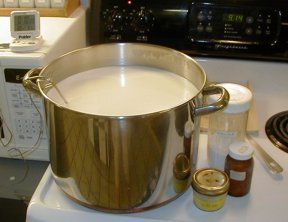
Pour the milk into a a "double boiler" pot set up and add the citric acid. Warm the milk to 91° (In the summer when my kitchen is hot, I can bypass using the double boiler to keep the milk at the correct temperature). Add the culture and lipase. Stir well and let ripen, covered, for one hour. |
|
|
Keeping the milk at 90° - 91° . Add the rennet and stir briskly for 15 seconds. I then kind of "stop" the milk from moving with my ladle. Cover and let set about 15 minutes, until the curd has "Set" or until you get a "clean break". It takes less time to set than other cheese due to the high acidity. You can check for a clean break by sticking your knife, or thermometer, into the curd at an angle. Pull straight up out of the curd; if the curd breaks cleanly around the knife and whey runs into the crack that is made; you have a "clean break." Once you see this for the first time, you will know just what I mean. Note: sometimes Moz will set but doesn't "break" quite the same as other cheeses, due to it's desire to hold together and stretch, but you can definitely tell it is "set". |
|
|
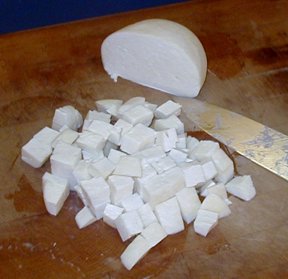
Cut the curds into 1/4" - 1/2" pieces. Cutting the curds can be the most confusing part, but just don't worry so much. Use a long knife held vertically and cut 1/4"- 1/2" slices in the curds. Then turn the pot 90° and cut across in 1/4"- 1/2" slices the other direction, making a kind of checkerboard pattern. Now hold the knife at a sideways 45° angle and retrace your cuts. Turn the pot 1/4 turn and retrace the cuts. Turn it again and cut and then one final turn and cut. By the last turn you probably won't be able to see the original cuts, but just do the best you can. Note: That oft times the Moz curds can be a little trickier to cut than other cheeses. It will want to move around in the pot while you try to cut it. You may need to hold it steady with your ladle as you cut it. I just your best; know one will know if it isn't cut "perfect". Do not stir yet. |
|
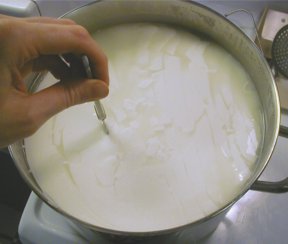
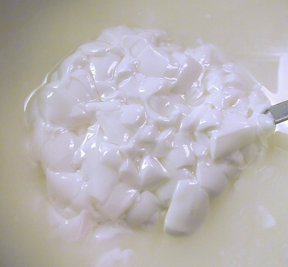 Stirring the curd after it has set for 10 minutes. Note how soft and delicate the curds look. |
Let the curds rest for 10 minutes (5 minutes for cow milk). The curds are delicate right after you cut them and they need to "harden up" up a little bit before you stir them. After 10 minutes (5 minutes for cow milk) stir the curds gently with a slotted ladle. Cut any large curds you missed when cutting the first time. When dealing with Moz, you will find it really wants to "knit" back together, especially if the ripening temperature got a little too high or you let the curds sit too long before stirring them. You may need to cut the curds apart with your knife and/or ladle. Cut the curds by using the ladle and the side of the pot or by holding the curds on the ladle and cutting with the knife. |
|
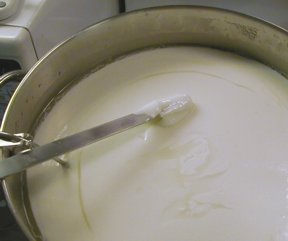
 The same curds after "cooking" for 10 minutes. The curds are getting more solid and smaller as they give up their whey. |
Keep the curds at 90° - 91°, covered, for an hour or so, stirring occasionally during the first half hour. I call this "cooking" the curds, even though you really are not cooking them per se. "Cooking" at a higher temperature will result in a cheese with less moisture (drier) cheese that is more rubbery and will yield less cheese per batch (the higher the moisture of the cheese = more cheese out of the same amount of milk). You can experiment with this if you wish; just don't raise the temperature over 100° and raise the temp slowly (no more than 2° every 5 minutes). This recipe works well for me, just as I like, it every time, so I don't experiment with it anymore and just stick with holding the curds at 90° - 91°. I stir once every 10 minutes of the first half hour of "cooking" for a total of three stirring sessions. After that, just let curd settle on the bottom of the pot where it will start to mat together. |
|
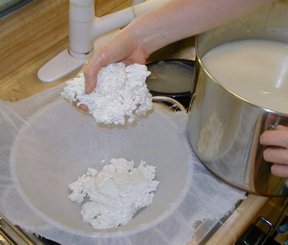 Moving the cheese wad to the cheesecloth/colander |
Place a large colander lined with cheesecloth over a pot to catch the whey and pour the curds into the colander. I actually don't even pour the whole thing into the colander because by now my cheese has become one lump and I just reach in the pot and pull out the cheese and place it into the cheesecloth. |
|
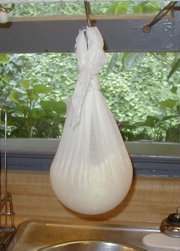 |
Tie up the ends of the cheesecloth and hang the curds to drain for a few hours (3-4). Save the whey and make Ricotta while the Moz is hanging. I always make Ricotta from Moz whey because the yield is fairly high compared to making Ricotta with whey from other cheeses. I'll get about a pound of Ricotta from the whey from this Moz cheese. |
|
 |
When the curd has drained for about 4 hours, remove it from the cheesecloth and "work" the curd OR, if you want to wait until tomorrow, place it in a gallon ziplock bag and place the bag in the fridge and "work" it sometime the next day. The photo to the right is the curd after it has hung for 4 hours. Yes, this is the same curd as all the photos about that is made with over three gallons of milk. It take a lot of milk to make a little cheese. |
|
"Working" or "Stringing" the curd: You can test the curd/cheese to see if it is ready to be worked. Cut off a small piece and put it in some hot water (170*). Keep feeling it and see if it begins to melt. Once it starts to melt, take it out and see if you can stretch it. If it stretches with no problem, you can go to the next step. If it breaks when you try to pull it, you have not developed enough acidity and the curd needs to "age" in the fridge a bit longer, maybe even until the next day. |
||
 |
When the curd is ready to be "worked" heat a large pot of water to 170° and add 1/2 cup Kosher salt. If I am working the curd the same day I made it and also made Riccota (I always make Riccota the same day I make Moz) I use the hot whey from making the Riccota instead of water; this makes the cheese even tastier and I find the curds "work" better as well.
Cut the curd ball/lump in half. You are going to work only one half of the cheese at a time. Cut the curd into approximately 1" cubes. |
|
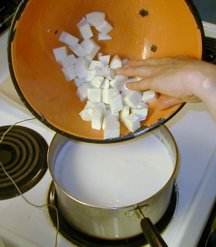 |
Carefully dump the cubed curds into the hot water/whey. Be careful because the water/whey is hot and it can very easily splash up on you when the curd cubes are falling into it. Let the curd cubes heat for a moment and carefully stir with a slotted flat type ladle. |
|
 |
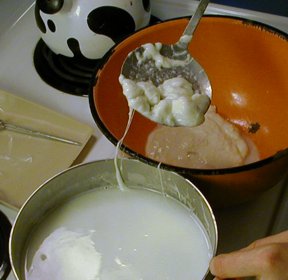
Squeeze the cubes with your fingertips to test. When the cubes feel soft throughout (not solid in the middle) they are ready for the next step. Since the curds will continue to soften while I am moving them to the bowl, I will let the largest ones still be a just little bit "solid" on the inside. |
|
 |
There is a line between not soft enough to "work" well, and and too soft and runny, you will learn with practice. The curds need to be soft enough, or they will not "work" and pull easily but too runny means failure (I have only gotten to this point once, when the phone rang). So, I say from experience, DO NOT let the curds heat too long, 'cause if they get too hot and runny, there is no going back. Don't answer to the phone when you are working your curds. Carefully remove them with the ladle to a large bowl. These curds are hot, so be careful. Take note that as you begin to work the curds, if you are rough with them, the cream will start to separate out. |
|
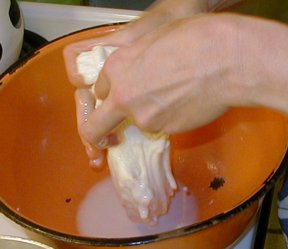 |
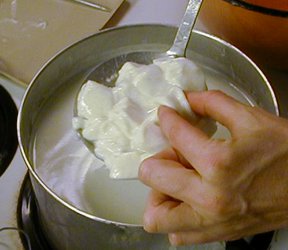
It may seem at first that you have a runny, horrible mess. Don't panic. Carefully take the curds in your hands and form them together into one mass. At first you may say "this isn't going to work," but don't worry, it will, just keep going. Gently fold one side over on the other to get it all to come together. Don't squeeze the curd or all the cream will come out and the finished cheese will be dry. Work the curd gently at first, this will help it retain it's cream. Keep a bowl of very cold water close by to stick your hands in when they get too hot from the curds. This cools them off and makes holding the hot curds easier. Some people say "knead" the curd like bread. I never found this to work well for me. I never "knead" the curd: I stretch the curd. Once I have gotten it to come together so that I can pick it up, I let the curd do the work for awhile: |
|
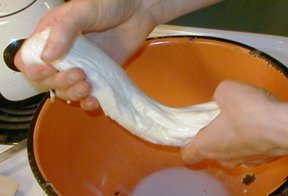 |
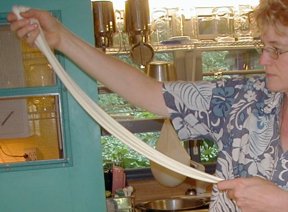
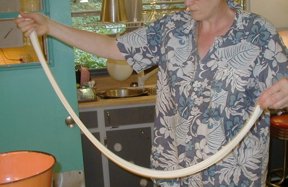
Hold one side of the curd lump and let the other end begin to stretch under it's own weight. When it stretches, fold up the bottom to the top and let it stretch again. As it begins to stretch you can start to help it along a little by pulling on it slightly. Keep stretching and folding. As you "work" the curds, they will stretch easier and easier. You will be able to pull the curds longer and longer. This part is actually kinda fun (except for the fact your hands are burning from the hot curd, but I digress) It becomes like pulling taffy. | |
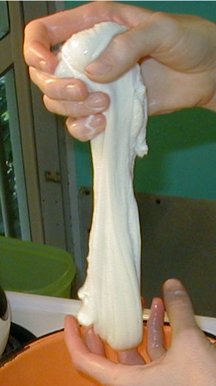 Letting the curds "pull" themselves. |
|
|
You will notice the nature of the curds changing. It will start to become shiny, smooth and elastic (some people say "opaque", not me, I say smooth, shiny and elastic ). When you get to this point, and you will know when you have (in about 10 to 15 good "pulls") Place the cheese (yes, not it is cheese) back in the water to warm them back up for a moment. |
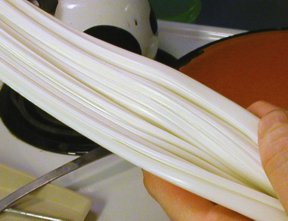 The whole nature of the curds had changed; it is now smooth and shiny. |
|
Remove the cheese from the hot water and plop it in to a mold (I use a clean plastic freezer container). Push the curd into the mold to even it up a bit. You don't have to get it perfect because the cheese is still very soft and it will even out as it rests and cools. Repeat the "working of the curds" with the remaining curd.
Let the cheese cool at room temperature for a couple hours. Place the cheese (in it's mold) into the fridge overnight. I don't bother to cover it, but you can if you wish. |
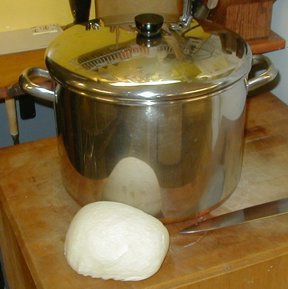
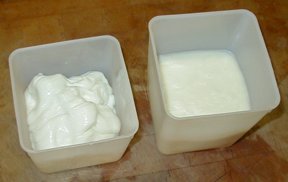 The cheese on the left has just been plopped into the mold. It needs to be patted to even it out a bit (but you don't have to be perfect about it). The cheese on the right was made first and it has sat and evened out as I "worked" the cheese on the left. |
|
The next day, pop and/or bang the cheese out of it's mold and your ready to make pizza. Put the cheese in a ziplock bag and store it in the fridge. It's ready to use right away, but is really better after a few days. This is one the few cheeses that freezes fairly well. |
||
Problems & Tips:
The recipe worked great until I put the curd in the hot water. Instead of getting stretchy it was kind of grainy and crumbly. Do you have any idea why?
This can be one of two things. You need to develop the acidity in the curd to get it to stretch as discussed in the recipe. This is why you add citric acid and why you let it sit overnight in the fridge. Test a small piece of curd before you try to "work" a large amount. If you have already dumped your curds in the water to heat, follow the direction about squeezing the curd to feel if it is ready to be worked. If you heat the curd and start to work it and it kinda goes together, but is grainy and breaks when you try to stretch it, this means you do not have enough acidity. Try heating the curd up a little more and try again. If a little more heating does not help you should just let the curds that you have not heated yet stay in the fridge 'til the next day and try again. It will probably work the next day. You may want to try adding a little more citric acid next time you try this cheese.
Now, if the curd breaks up, becomes a mess when you heat it, and there is no way it is going to come together, that means that you developed too much acidity. There is nothing you can do to "save" this cheese. Don't add as much citric acid next time.
What does it mean when the milk turns into a big soccer ball at the bottom of the pot? I let it ripen for an hour...went to cut it into cubes and it was laying at the bottom of the loch like nessie least it didn't rear it's ugly head...
You just need more practice in cheesemaking. You will notice in my recipe that I say Moz is NOT the easiest of cheeses to make and I recommend practicing with other cheeses before attempting Moz. Ricotta doesn't count <smile>, you should try others as well to get an idea how it works.
You didn't make a mistake, you just don't have the experience to know what went wrong; IF indeed anything went wrong. If you try Moz a few times, you will see it reacts differently then other cheese you have made (assuming you have tried others).
The Moz curds, after ripening and then adding the rennet, are very different than most cheeses. They can be VERY difficult to cut, but you try the best you can and continue with the recipe. I often cannot get prefect cuts, and just cut the curds smaller, as necessary during the stirring stage. You ripen for one hour before adding the rennet, and after adding the rennet, you will cut in about 15 minutes. The longer you wait after adding the rennet, the harder it will be to cut.
During the "cooking" and stirring stage, yes, the curds can and will become a large lump in the bottom of the pot if you do not stir it often enough or if you raise the temperature. As well as not stirring, this lumping and be an indicator of either too much citric acid, too long a ripening stage, or too high a heat. All of these things result in too much acid, which cause the curd to lump (stick) together. My Moz often is one lump before I pour it into the cheesecloth for draining. This is very different from Feta curds, which stay nicely separate. I have found the "lump effect" dose not ruin the outcome of the final cheese, so just keep on, keepin' on, with the recipe. But, I would defiantly "work" the curds that afternoon or first thing the next morning because if you wait much longer you may develop too much acid.
With experience, you will learn how to handle this difficult to master cheese. Keep detailed records and carefully follow recommended quantities and temperatures.
A Tip from Suzanne E. Reed
I had the enjoyable blessing of family friends who were first generation Italian americans. The "hot water" you refer to has always been in my experience a brine. This brine is made the day before by heating water and adding salt until it will no longer dissolve into the water. This can be chilled overnight along with your curds. The next day heat the brine set your curds out to warm to room temperature and work, then boil in the brine. This adds both flavor and has a big impact on the sticky goo mess that comes from the curds absorbing the water. The curds will not want to absorb the brine. One final tip. When "working" the curds let them fold across themselves (some what like the folding that happens in kneading) a few times then fold a last time and grip in your fist into a cylinder allowing the top to be open. The top is made by your thumb and pointer finger. The bottom of this cylinder is closed. The as you squeeze the worked curd up and out the top of the cylinder you create the ball shape and pinch the fold ends together as it exits the cylinder of your fist. Immediately drop into boiling brine.