
Build your own Cheese Press
Instructions
Once you start dabbling in cheesemaking you are going to want to try your hand at making "hard" cheeses; to do this you will need a cheese press. You can spend a lot of money on a pre-made press, or you can save big bucks and make your own. There are many ways to construct your own press, just use you imagination. Use quality products to make your press and it will more than pay for itself with years of service. Here's how I made my press.
Supplies:
- 2- Wood (maple) cutting boards (approx. 16" X 9 1/4")
- 2- 3/4" oak dowels cut into four (4) 16" long pieces
- 4- 1 1/4" (#8) stainless steel Phillips head screws
- 4- stainless steel or nylon 3/8" flat washers
- (3/8 is the size of the hole, the washer should be 1" wide)
- 4- Stainless steel or nylon size #10 finish washers
- mineral oil
- a metal pie pan
- 50 pounds worth of weights (I use barbell weights: 3- 10 pound and 4- 5 pound)
Tools:
- Electric drill
- 3/4" and 1" spade wood boring bits
- 1/8" drill bit
- Phillips screw driver
- sandpaper- Medium, fine and very fine grit
- tin snips
Instructions:
- In the board that will be the bottom of your press, use a 3/4" spade bit to drill four holes (one in each corner) See Figure 1.
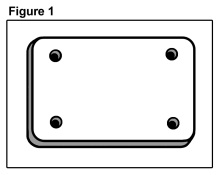
- Use the bottom board as a template to mark where the holes go in the top board. Drill these holes with a 1" spade bit.
- Sand the holes smooth and round the edges of the holes.
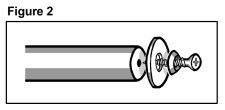
- Sand the lengths of the dowels and round the edges of one of the ends. Sand flat the other end, but do not round the edges.
- Drill a 1/8" hole in the flat end of all four dowels to accommodate your ss screws.
- Place a finish washer on each screw, then the flat washer. And screw them onto the dowels. This creates the "legs" of your press with nice "feet". See Figure 2.
- Test your dowels and make sure they fit nicely through the holes in the boards. Sand accordingly.
- Rub mineral oil into all the wood surfaces (this protects the wood).
- You need to make a "drip spout" in the pie pan. Using some tin snips, cut down the lip and side of the pie pan to the bottom of the pan. Move over two inches and make another cut. Trim, cut and bend to create a spout. (see Figure 3)
- You press is now ready to use.
Fitting your press together :
(see Figure 3)
- Slide the "legs" into the bottom board.
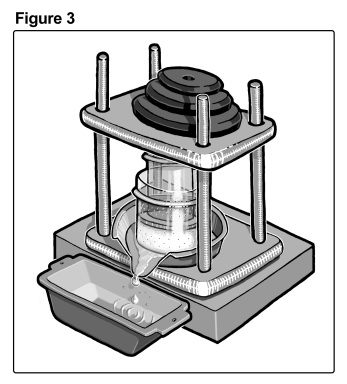
- Flip the board and set the legs on their "feet" on a raised surface (for the purpose of draining).
- Put the "drip pie pan" on the bottom board.
- Position a drip catch pan (I use a bread pan) under the spout.
- Place your cheese mold (with curd), it's follower and your "pusher" (I use the next size down cheese mold for my "pusher") on top of the pan.
- Feed the tops of the legs through the holes in your top board.
- Balance the appropriate amount of weight for the particular cheese that you wish to press on the top board. and there you go, you're pressing cheese.
© Illustrations Copyrighted- Fias Co Farm